 RoamlineiPhone app concept · September 2026
A trip planner I had
to redesign twice.
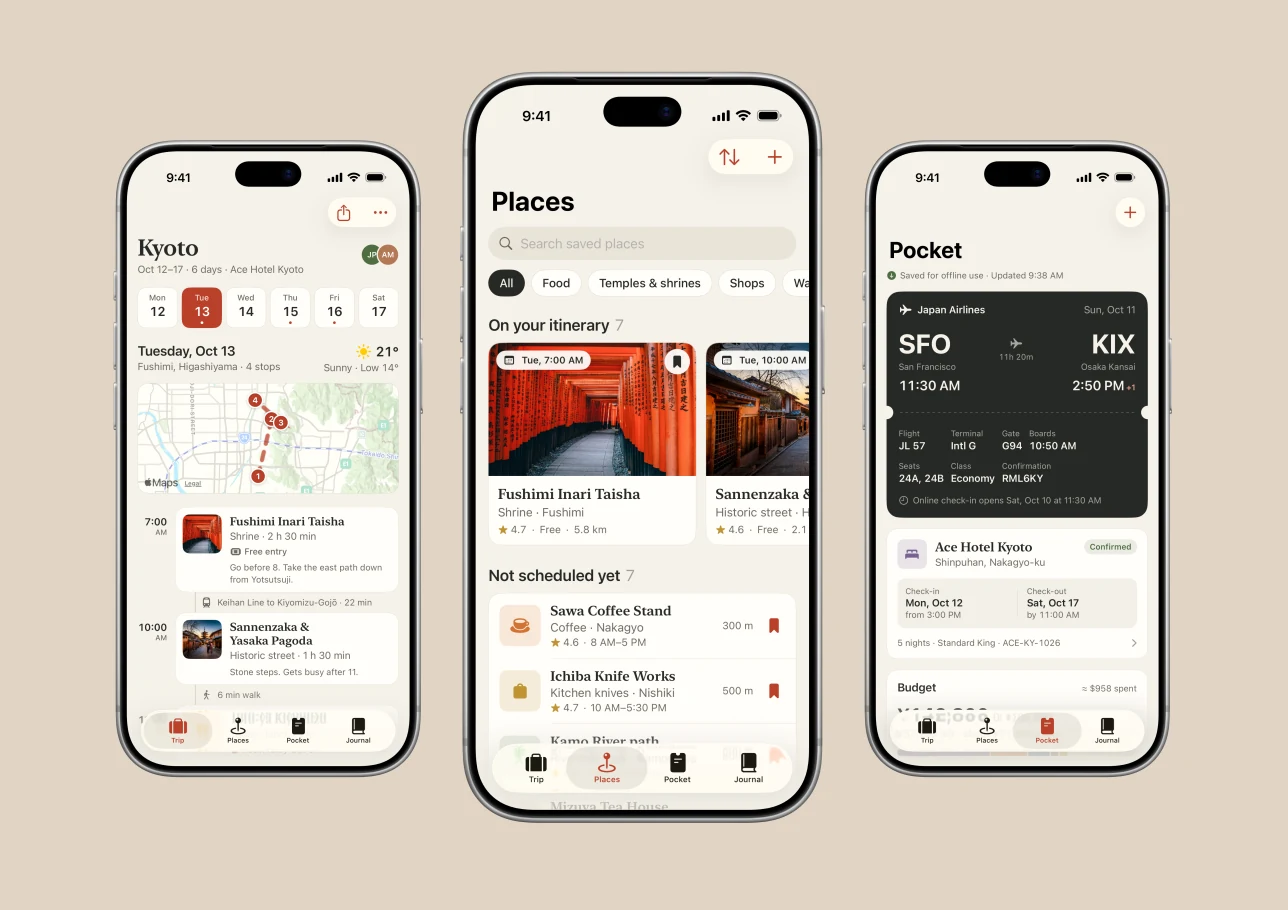
Roamline is an iPhone app for a six-day trip to Kyoto. It keeps the day’s plan, the places I’ve saved, and the flight and hotel details that would otherwise be buried in my email, all in one app.
- Format
- SwiftUI prototype
- My role
- Concept, design direction, review
- Built with
- SwiftUI, MapKit, AI coding tools
- Platform
- iPhone · iOS 17+
The idea
Trip details end up everywhere.
I gave myself a brief: design five iPhone apps that feel like different products, and build them in SwiftUI so they actually run. Roamline is the travel one. The sample trip is six days in Kyoto.
The problem is a familiar one. The plan lives in a notes app, saved places live in a maps app, and the hotel confirmation is somewhere in an inbox. Roamline pulls those into one place without turning the trip into a spreadsheet.
Who it’s forSomeone on a short city trip who wants a rough plan for each day but still likes to wander.
The tabs
Each tab answers one question.
I split the app by what you’re trying to do in that moment: follow today’s plan, find somewhere to go, pull up a booking, or write down what happened.
- 1
Trip
What’s the plan today?
Day picker, route map, timed stops, travel between them - 2
Places
Where else could we go?
Search, categories, hours, distance - 3
Pocket
Where’s the booking?
Flight, hotel, budget, packing list - 4
Journal
What do I want to remember?
Dated entries with photos
Saving a place and adding it to a day are separate on purpose. Saving means “maybe.” Adding puts it on the schedule with a time. The place sheet shows which one you’ve done, and places already on the itinerary show the day and time right on the card.
Visual design
Warm, but still a tool.
The colors come from Kyoto: an off-white background, a vermilion accent borrowed from the torii gates at Fushimi Inari, and charcoal text. The only serif is on place names, so they read like names on a map or a menu. Times, durations and prices are in SF Pro so they’re quick to scan.
The Trip tab leads with a map of the day’s stops instead of a big hero photo. Between each stop there’s a line saying how to get to the next one, like “6 min walk” or “Keihan Line · 22 min.” That’s usually the thing I actually need to check when I’m out.
Walkthrough
A morning in Kyoto.
A typical morning: check today’s plan, look for somewhere nearby, then pull up the hotel details.
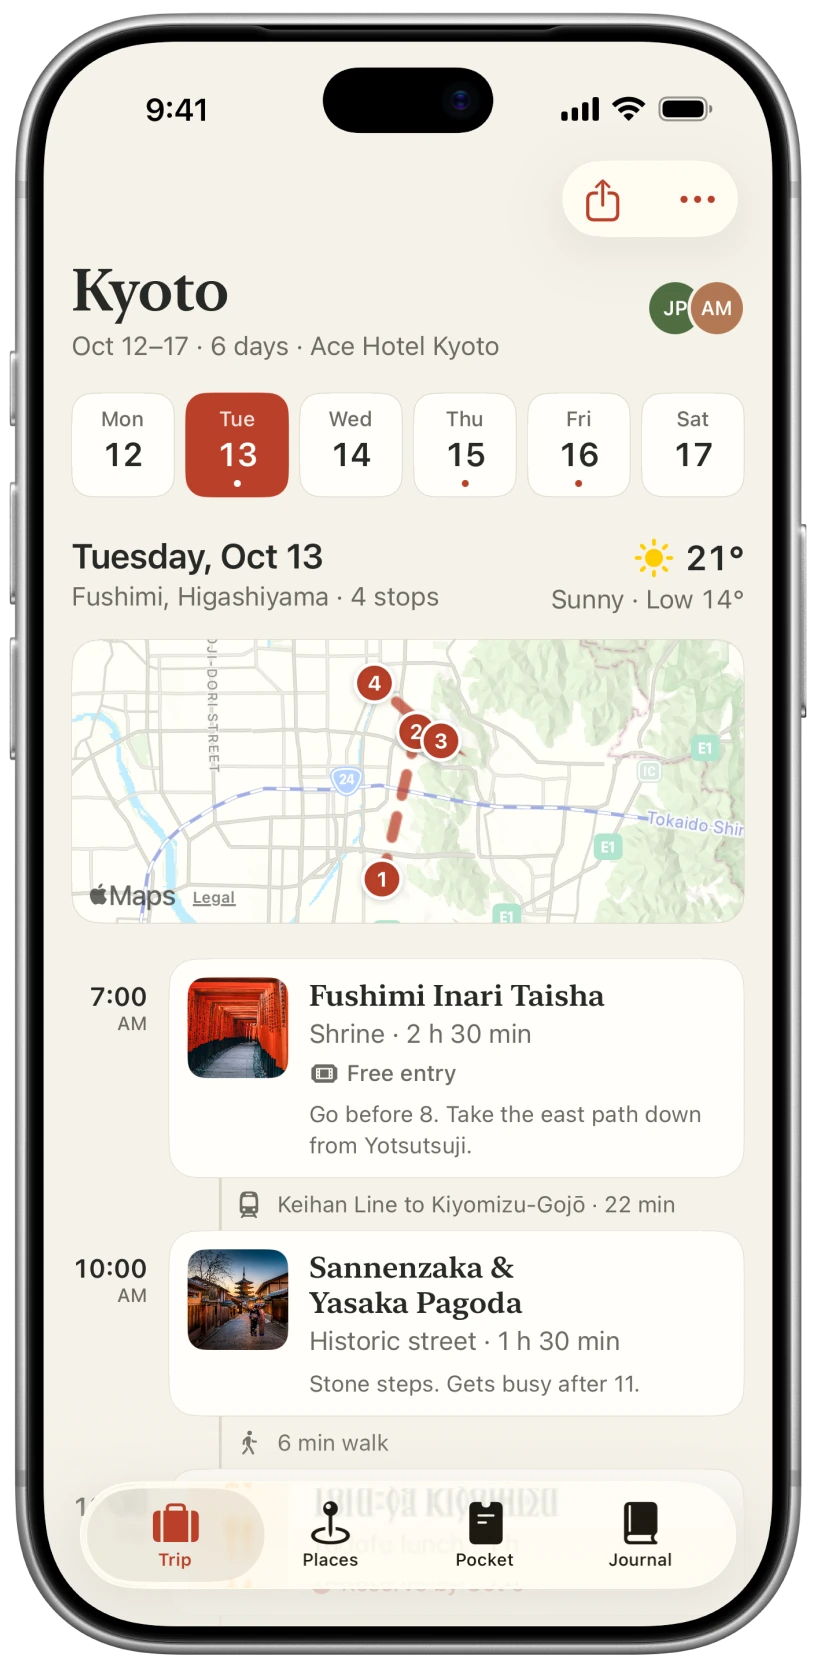
Trip See the day.
Pick a day at the top. The map shows the stops in order, and the list has times, how long to stay, whether you need to book, and how to get to the next stop.
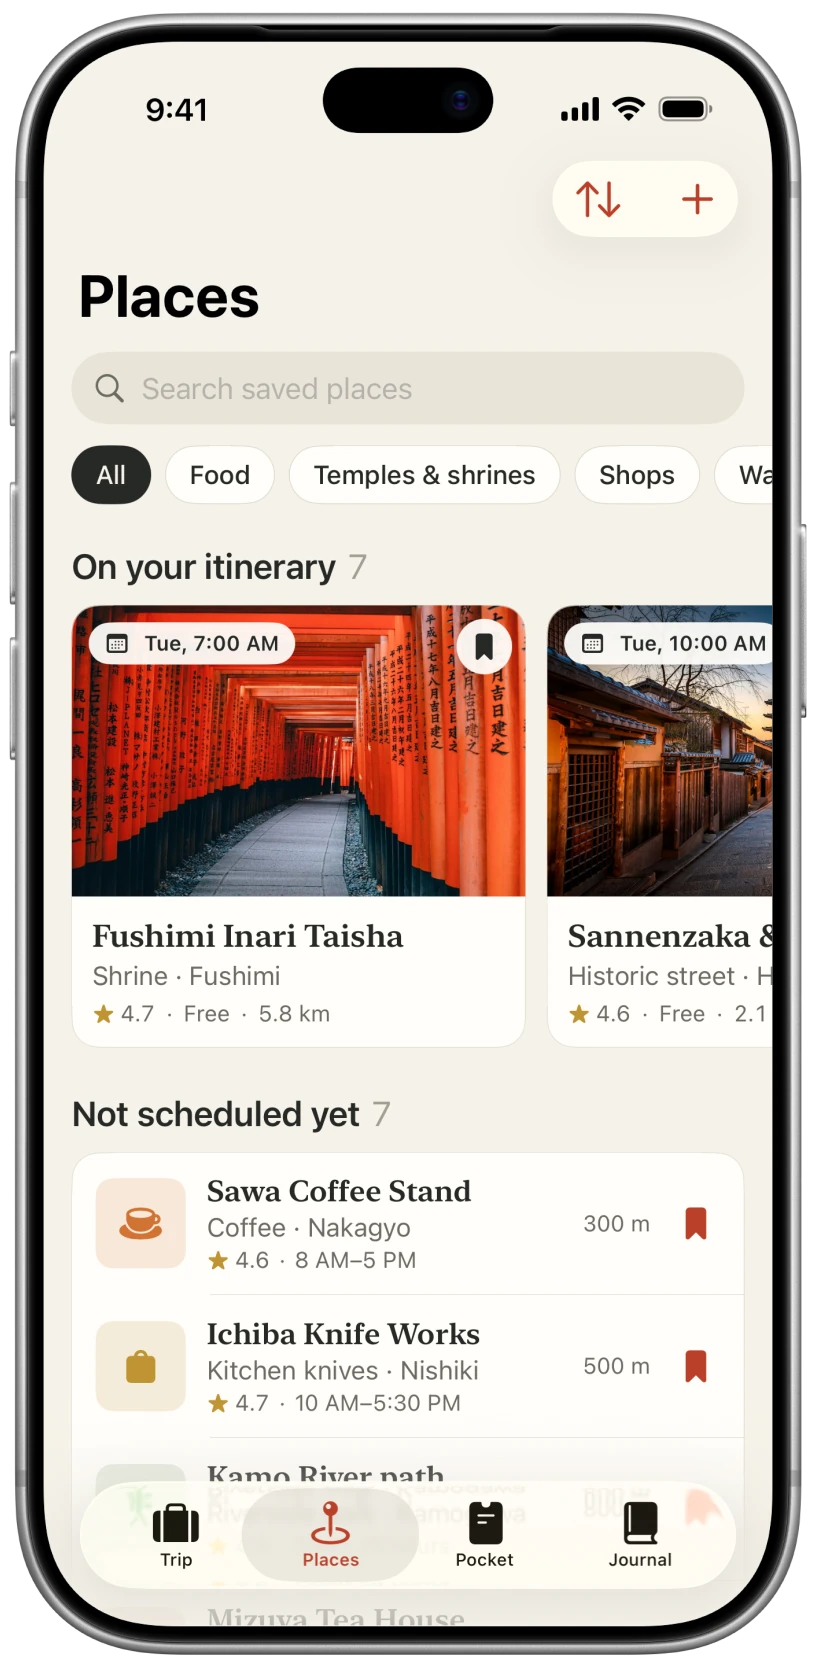
Places Find somewhere nearby.
Places already on the itinerary show when you’re going. Everything else sits in a list with hours, rating and distance. Filters cover food, temples and shrines, shops and walks.
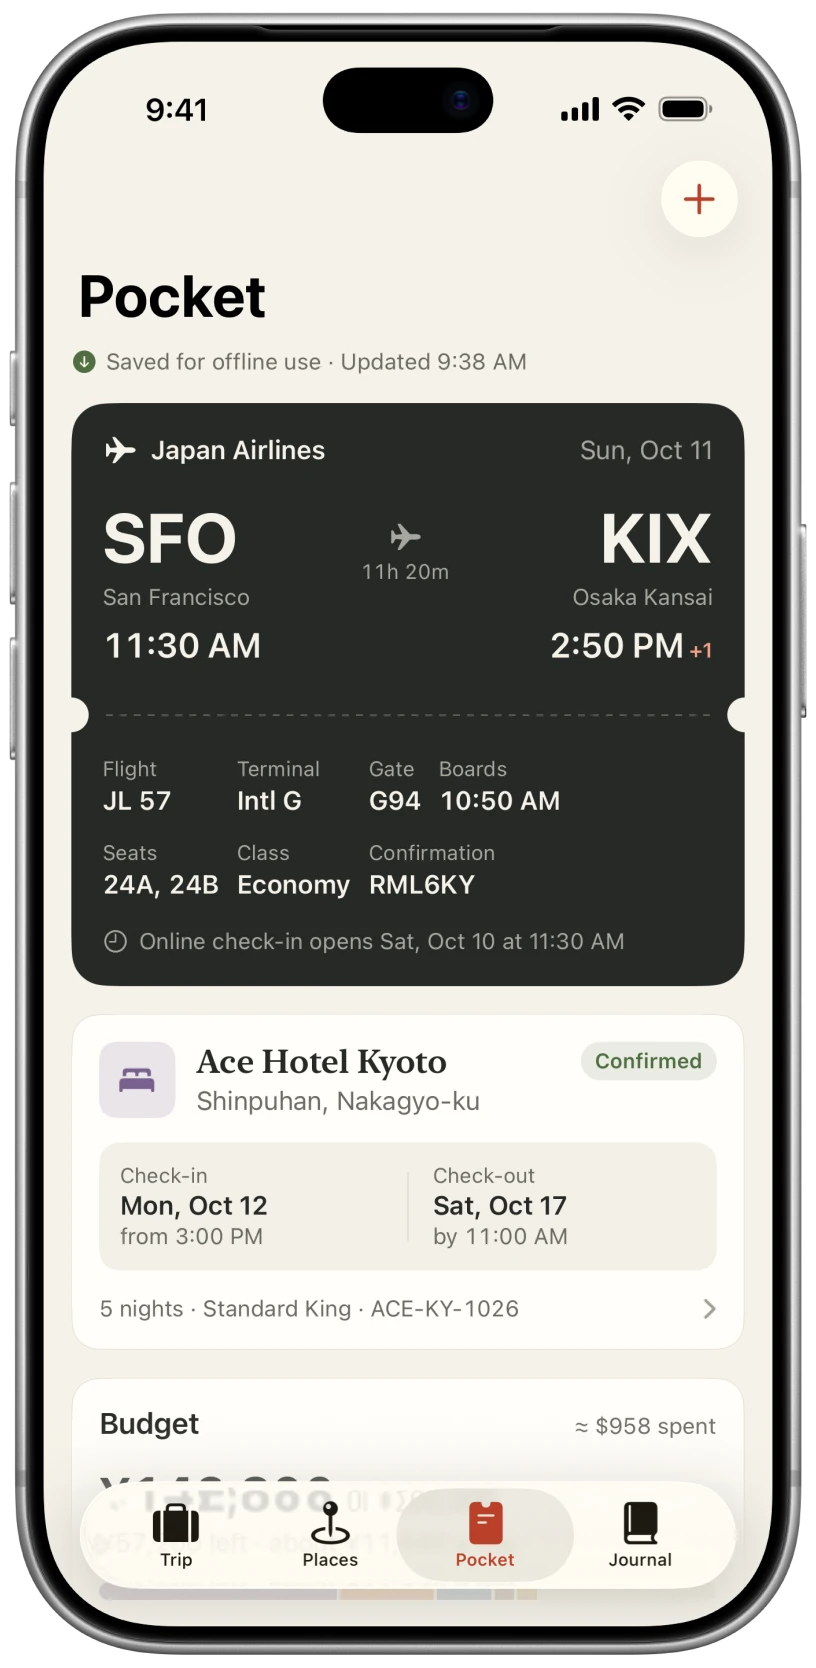
Pocket Pull up the booking.
The flight looks like a boarding pass, with gate, seats, boarding time and confirmation code. The hotel card has check-in times and the booking number. It’s all saved for offline use.


Screens captured from the iPhone Air simulator.
Two redesigns
What I changed, and why.
The first change was the tab bar. The first build had a custom row of buttons at the bottom. I swapped it for the standard SwiftUI TabView, so it picks up Liquid Glass on iOS 26 and behaves like every other iPhone app. I lost some control over how the bar looks, and that was worth it.
The second change was bigger. When I lined up all five apps side by side, they looked like they came from the same template, and honestly like AI had made them. Every screen opened with a slogan in a big serif (“Kyoto, slowly.”), tiny spaced-out labels in a monospace font, and the logo in the corner. The copy was cute instead of useful: “A gentle beginning,” “Room for the unplanned.”
So I set a few rules and redid all five. No slogans: each screen is named after what it shows. Plain labels. More real information on every screen, like travel times, opening hours, booking status and confirmation codes. And each app got its own typography so they stop looking related. For Roamline, that meant keeping the serif but only using it for place names.
Demo
The app, running.
A short recording from the simulator: switch days on Trip, open a place, then check Places and Pocket.
Download the videoWhat happens in the video
It starts on Trip with Tuesday selected. Thursday is tapped, which swaps in that day’s route and stops, then Tuesday again. Tapping Fushimi Inari opens its sheet with hours, travel time from the hotel and a note, then it closes. The Places tab scrolls through saved places, and the Pocket tab scrolls from the boarding pass down to the budget and packing list.
Real time, no sound. Only the pauses between taps are cut.
Scope
What works and what doesn’t.
All four tabs work with sample data. You can switch days, change the trip dates, add a saved place to any day at a set time, search and filter places, add flights, bookings and expenses, tick off the packing list, write a journal entry and export the plan as a PDF.
- Content
- The trip, bookings, prices and journal entries are made up. The landmarks are real; the restaurants and shops are fictional. The map is the only part that needs an internet connection.
- State
- Everything is kept in memory, so changes last until you close the app. Travel times between new stops are rough estimates.
- Services
- No accounts, real bookings or live weather. Inviting someone adds them to the trip but doesn’t send an email.
- Testing
- I’ve built it and reviewed it on the simulator. I haven’t tested it with other people yet.
What’s next (not done yet)
What I’d test first.
Next I’d sit down with a few people who are planning a city trip and give them three tasks. The point is to find out whether the tabs make sense before building anything real.
Find the first stop, then switch to Thursday.
Do people get the day picker without an explanation? How long does it take, and do they go back and forth?
Find your seat number and the hotel check-in time.
Start them on a different tab. Which tab do they try first?
Save a place, then add it to a day.
Ask what they expect each action to do. My guess is people will mix the two up.
What I learn would change the labels, what’s shown by default and how much goes on each screen. I’d check larger text sizes and contrast at the same time.
Photos from Unsplash: Kyoto streets, Fushimi Inari and lantern-lit street.